What path to victory will you pursue to become the Grand Prince of Kiev?
What Is Rurik: Dawn of Kiev?
Rurik: Dawn of Kiev is a mid-weight euro-style game about the power struggle in 11th Century Kievan Rus for 1-4 players, ages 13 and up. It’s advertised to take 30 minutes per player, and for once, the play time on a game box is accurate! It’s designed by Stanislav Kordonskiy, and was originally funded in a Kickstarter campaign in July 2018, before shipping to backers this fall and becoming available at stores. The game retails for $89.99, and at the time of this writing both the retail version and the Kickstarter version are available in PieceKeeper Games’ online store. I was sent the Kickstarter version to review, along with the neoprene playmat and metal coins, which were add-ons available during the campaign but are still available to purchase in limited quantities.

Rurik: Dawn of Kiev Components
Here’s what you’ll find in the retail box:
- 71 Plastic Miniatures (8 @ 40+ mm scale, 63 @ 28 mm scale)
- 4 Plastic Leader Bases
- 66 Wooden Resources
- 36 Wooden Structures
- 24 Wooden Advisors
- 12 Wooden Claim Markers
- 4 Wooden Warfare Markers
- 1 Wooden First Player Marker
- 27 Scheme Cards
- 26 Deed Cards
- 11 Agenda Cards
- 19 Solo Cards
- 8 Leader Cards
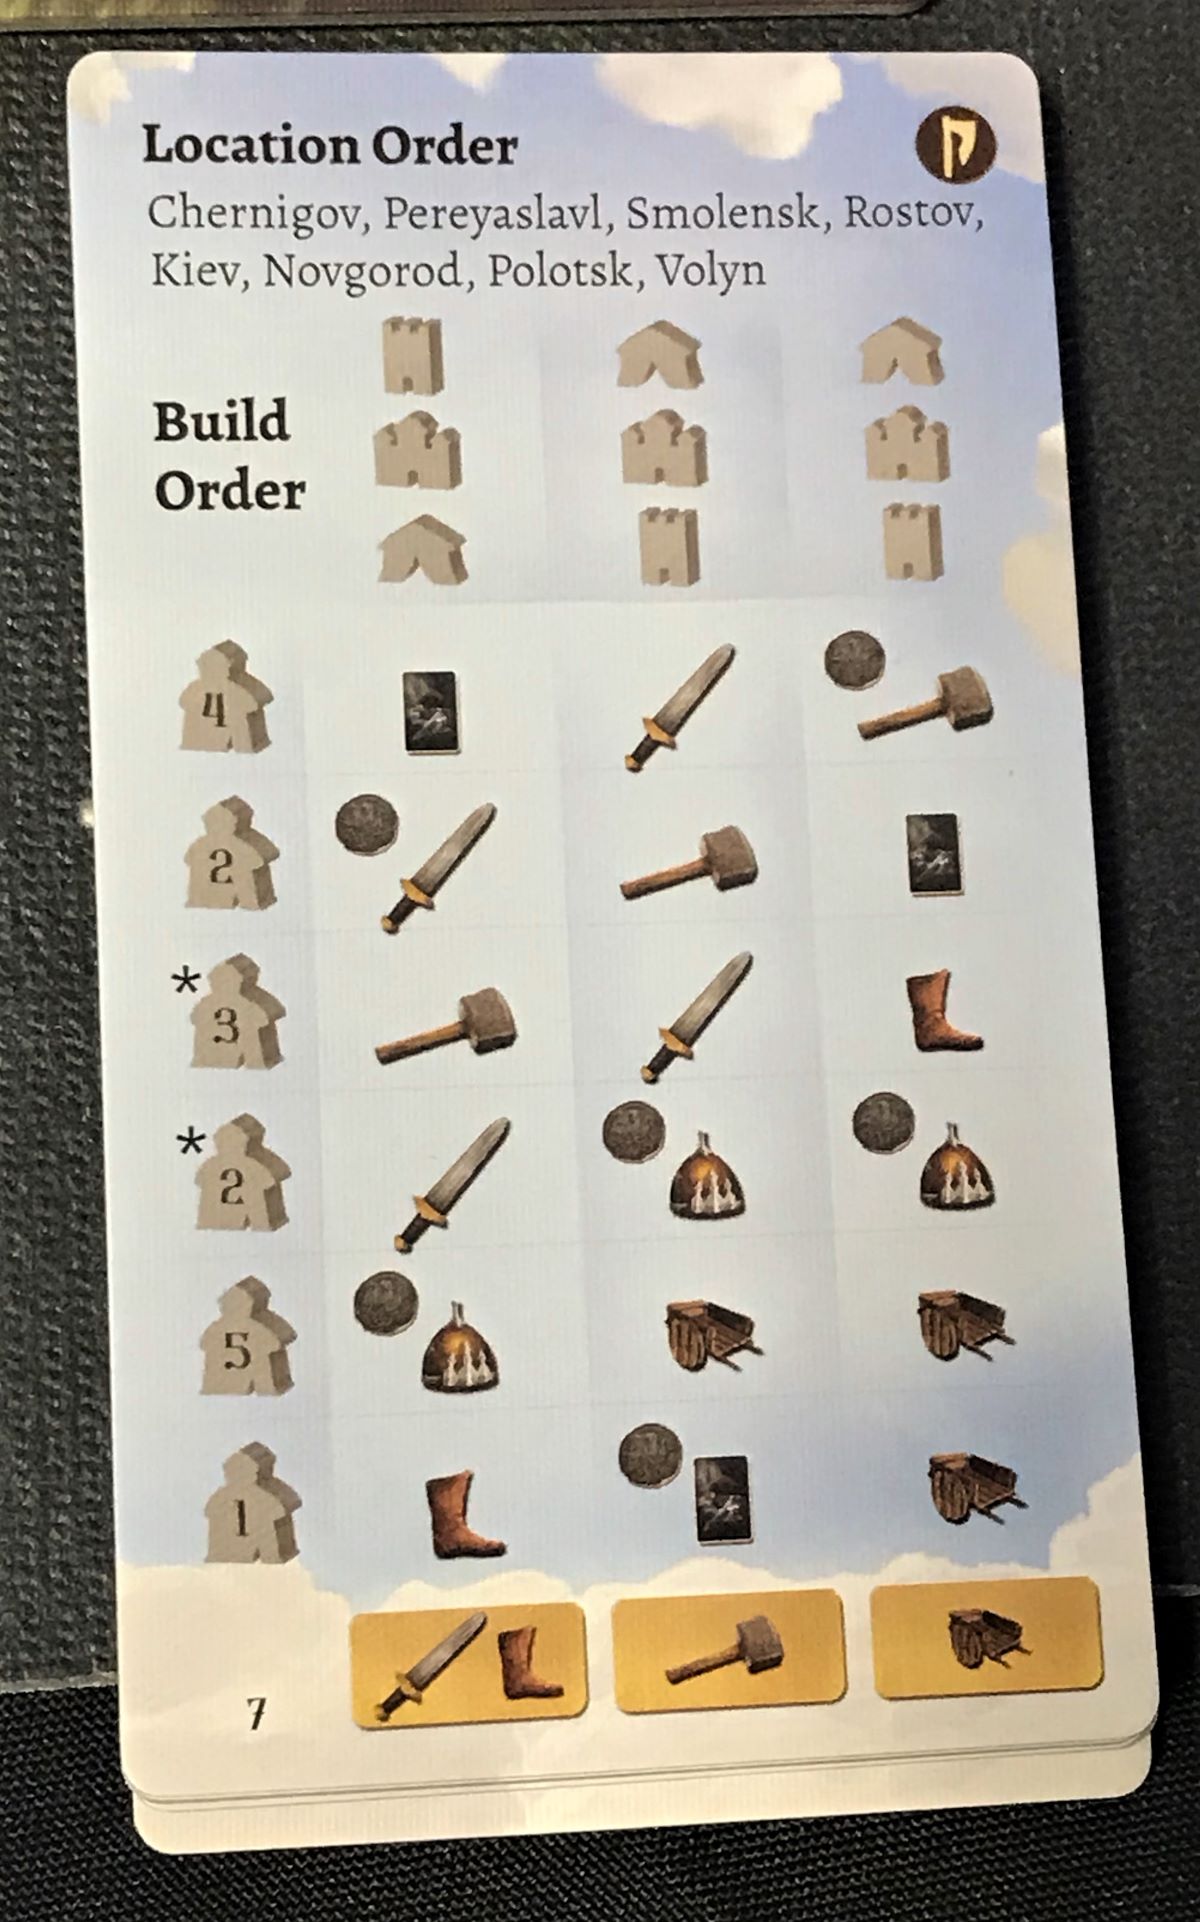
- 4 Reference Cards
- 36 Punchboard Coins
- 30 Variant Tokens
- 8 Conversion Tokens
- 4 Household Mats
- 1 Game Board
- 1 Claim Board
- 1 Strategy Board
- 1 Round Marker
- 1 Rulebook

In the Kickstarter box, you will additionally find a deck of 11 Intrigue cards, as well as a set of 4 plastic player trays and lids that hold your advisor meeples, plastic troop miniatures, wooden structures and markers, and matching bases. While not required to play, the trays are very convenient for organizing each player’s pieces, and are also available for purchase separately. The Intrigue cards function as a mini-expansion, which provide a little extra variety to the gameplay.
The quality and thought that went into the design of the game starts with the components, and I was impressed just upon opening the box. One of the first things you’ll find is a graphical insert, showing you how to repack your copy of the game:

A guide like this is immensely helpful. There is no wasted space in the box, so you’ll have to repack the components properly if you want to be able to close the box up again for storage.
Even if you don’t get the Kickstarter version, you still get a couple of very nice trays to help organize your game and get it to the table faster. There is a lidded tray to hold all of your coins and resources:

As well as a tray down at the bottom to hold your cards, variant game tokens, rebel miniatures, and leader miniatures:

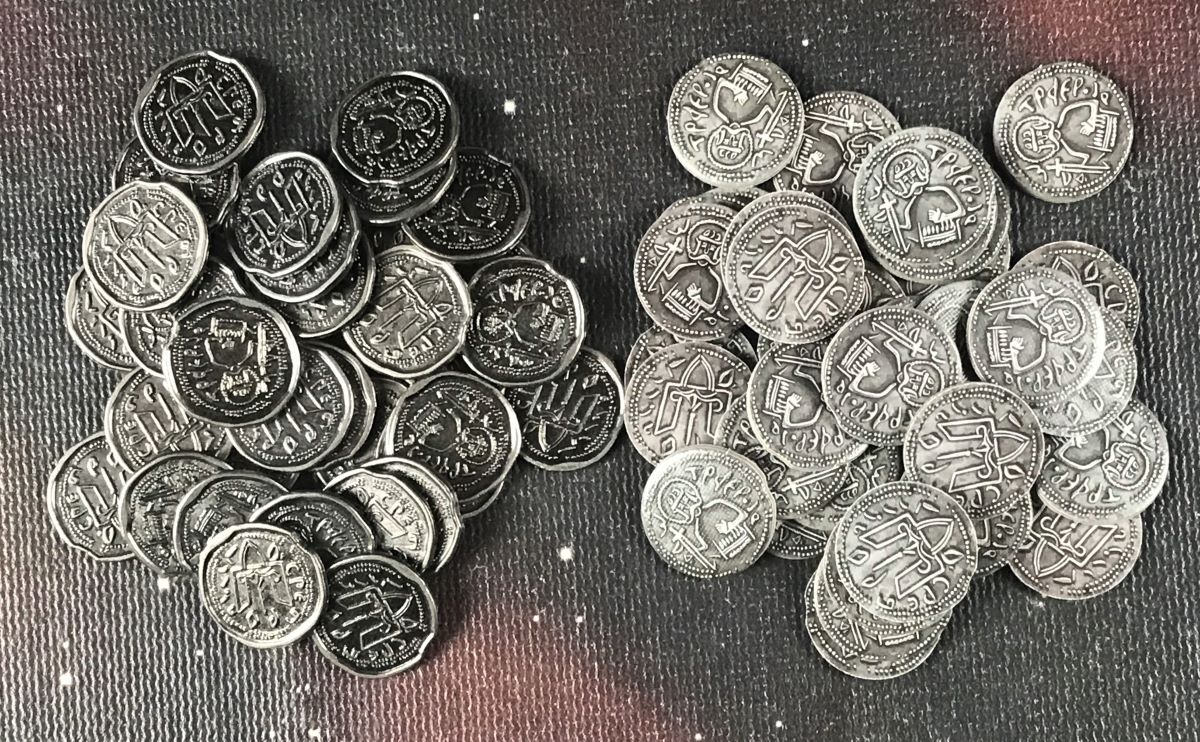
The leader figures are molded plastic that match the artwork on their cards, while the structures, markers, advisors, and first player marker are all painted wood. The coins that come in the base game are cardboard, but have an exceptionally nice 3D-looking design. However, for me nothing beats the feel of metal coins when playing a game, so if you’re like me, you might consider picking up that optional purchase.
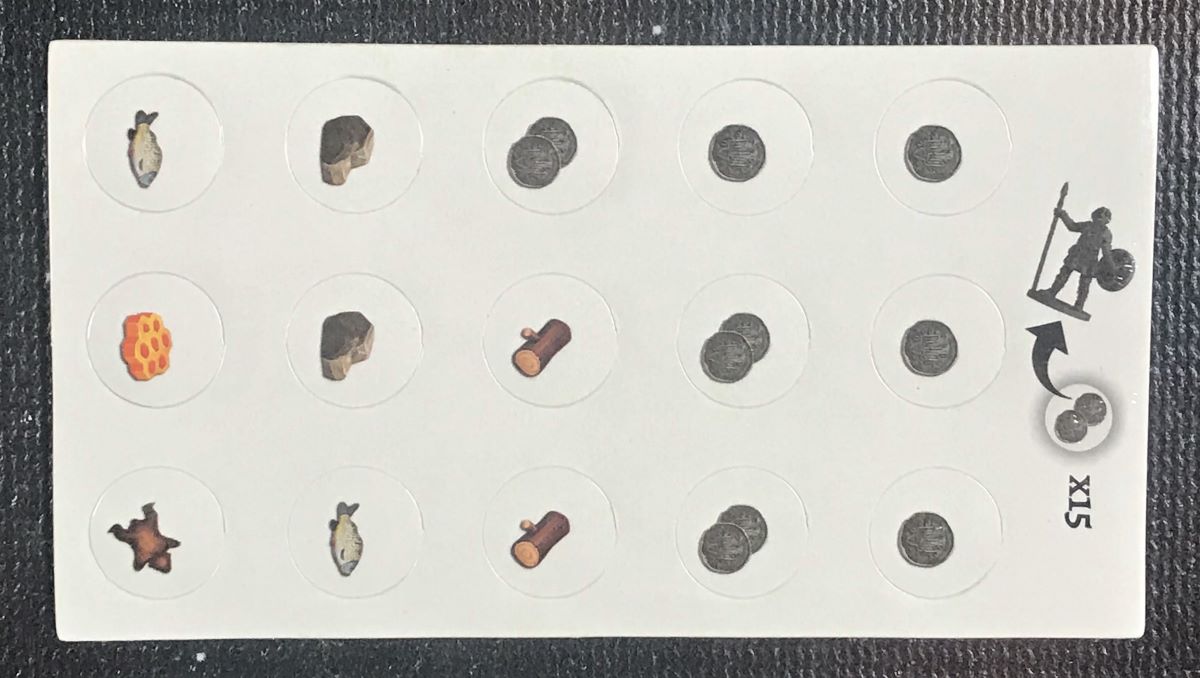
One of the first things you will do before you play the game will be to take the included sheet of stickers and apply one to the bottom of each of the black rebel miniatures. These will indicate the resource(s) you will gain when you attack a rebel soldier.
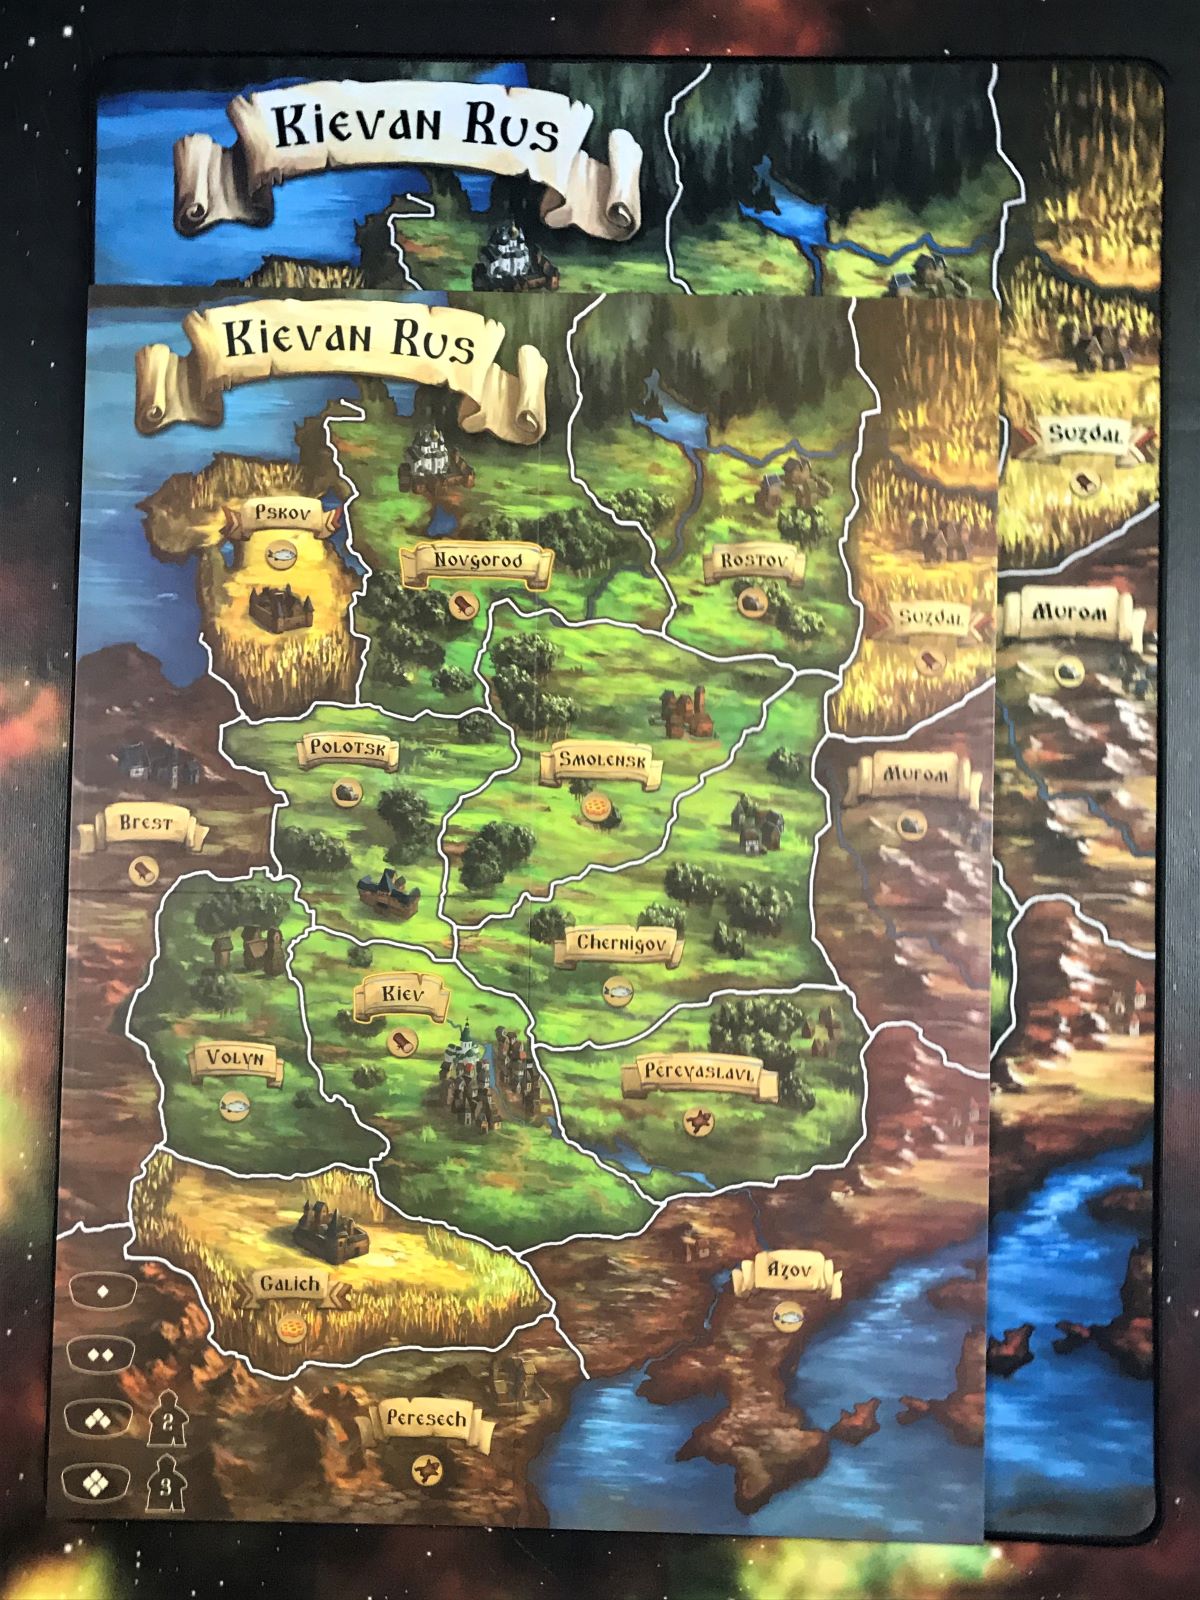
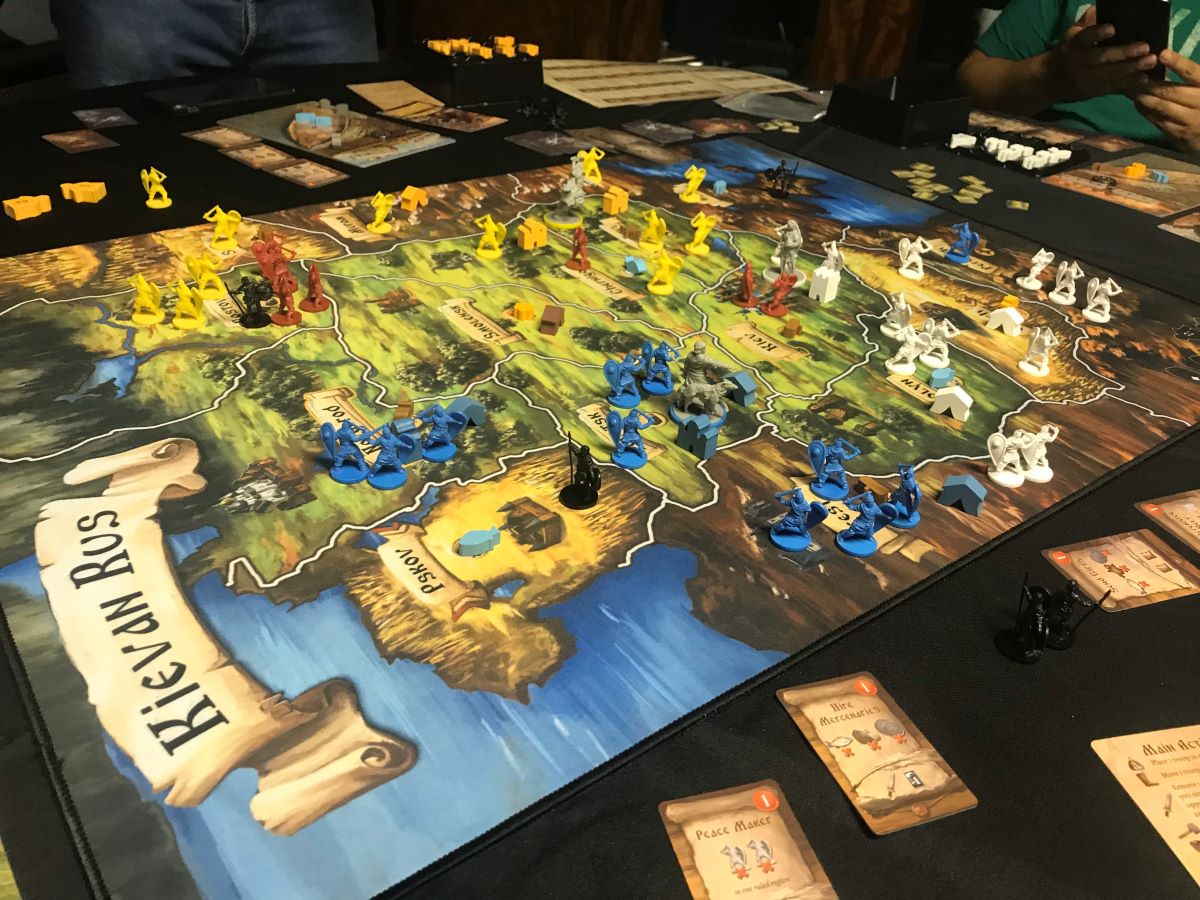
The map for the game board is brightly illustrated, with clear delineations of area borders, as well as room on the bottom left corner for both the round tracker and reminders to grab additional advisors during rounds three and four. Games with fewer players will use fewer areas on the map, and instead of going the double-sided board route that some games will have (or even separate boards for each player count), Rurik uses a color system. 2-player games or solo games use only the green regions, 3-player is green and yellow, and 4-player uses all the regions, adding in the brown ones.

Though I have been told they are in extremely limited quantities, there are still some of the optional purchase neoprene playmats available from the PieceKeeper store. These mats are some of the highest quality I have played on, with edge stitching, a vibrant print, and are 44% larger than the included game board. I’ve included a photo below to show a comparison between the standard board and the neoprene mat:
In addition to the game board, there are several smaller boards for use in the game. Each player receives a Household Mat, which will hold their resources and give them a place to slot any deed cards they have fulfilled. These are double sided, with one side for normal games, and the reverse side used in solo games.
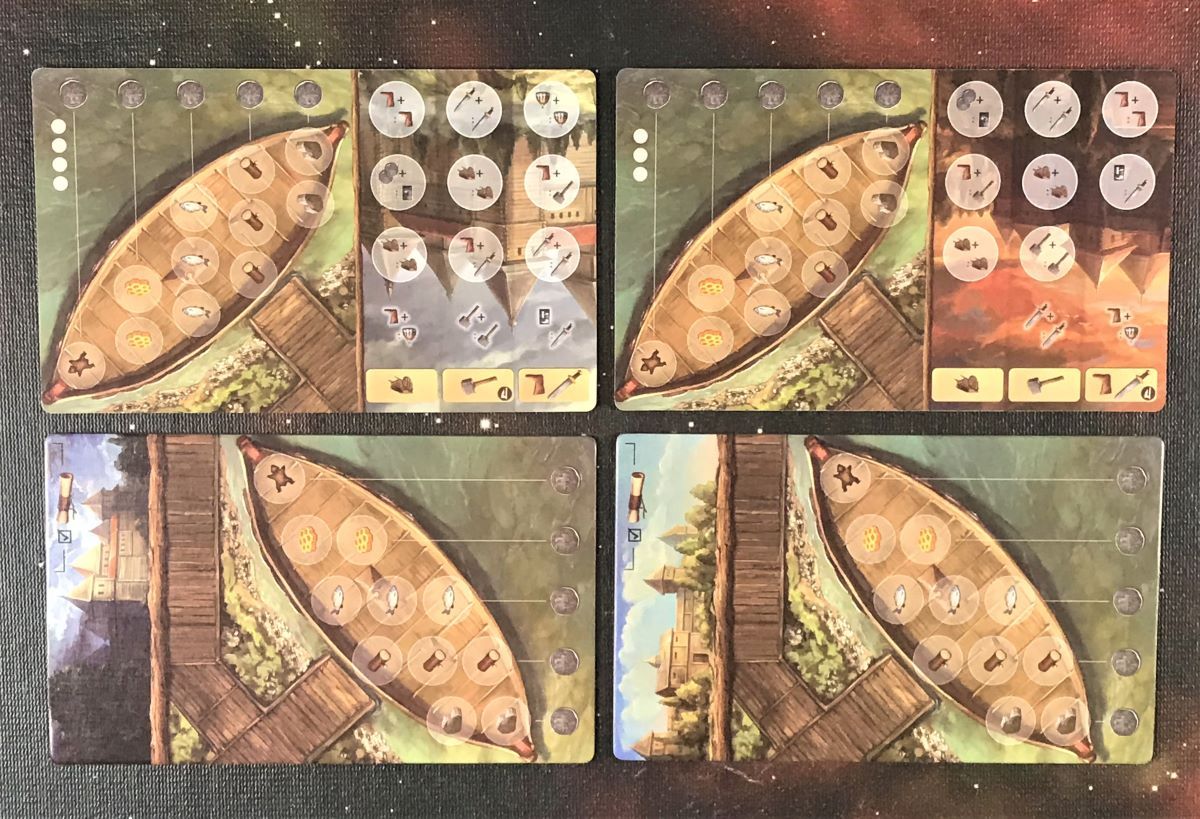
The other two boards are the Claim board, used to mark each player’s progress towards final scoring:

And the Strategy Board, where players will take turns placing their advisors during the Strategy Phase:

The strategy board is double sided, for varying player counts.
The artwork by Ukrainian artist Yaroslav Radeckyi strongly evokes the middle ages in Eastern Europe. It feels authentic, and perfectly ties all of the components together with the game’s theme.
How to Play Rurik: Dawn of Kiev
You can read the rulebook here or watch a “how to play” video:
The Goal
The goal of Rurik is to end the game scoring the most victory points, which is done by working your way up the Claim Board, accomplishing your secret agenda, and fulfilling deed cards.
Setup

Lay out the game board, claim board, and strategy board. Be sure the strategy board is on the correct side for the player count of the game. Off to the side, place the plastic supply tray containing the goods and coins.
Give each player a household mat, placed vertical side up. Each player should also receive three coins from the supply, which they place on the dock pictured on their mats. Finally each player should take two conversion tokens and place them above the dock.
At random, place one of the rebel miniatures in each of the regions in play. Return any unused rebels to the box. Also for each of the regions in play, take one of the matching goods from the supply and place it onto the board over its image.
Shuffle the scheme cards and split them into two decks of roughly even size. Place them face down to the side of the board, leaving room between the two decks for a discard pile. Shuffle the deed cards and place the deck face down above the claim board. Reveal the top three cards of that deck and lay them out in a row, face up.
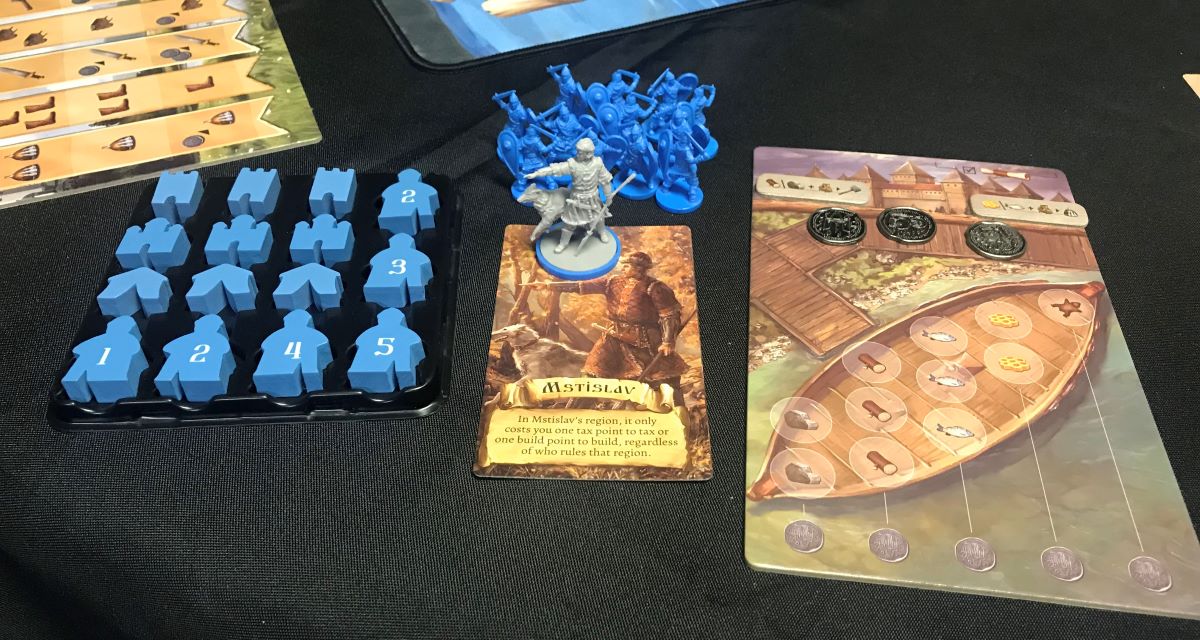
Each player selects a leader card, taking the appropriate miniature. They select a color, taking all the pieces matching that color, and attaching the colored base to the bottom of the miniature. Each player then places one claim marker each under the rule, build, and trade tracks of the claim board, and their warfare marker under the warfare track. Each player also places one of their #2 advisors next to the “3” space on the round track, and their #3 advisor next to the “4” space on that track. In a 4-player game, the #3 advisors aren’t used. The round marker goes on the first space of the round track.
Shuffle the agenda cards and deal two of them facedown to each player. Players will choose one, keeping it hidden from the other players, and return the other to the box.
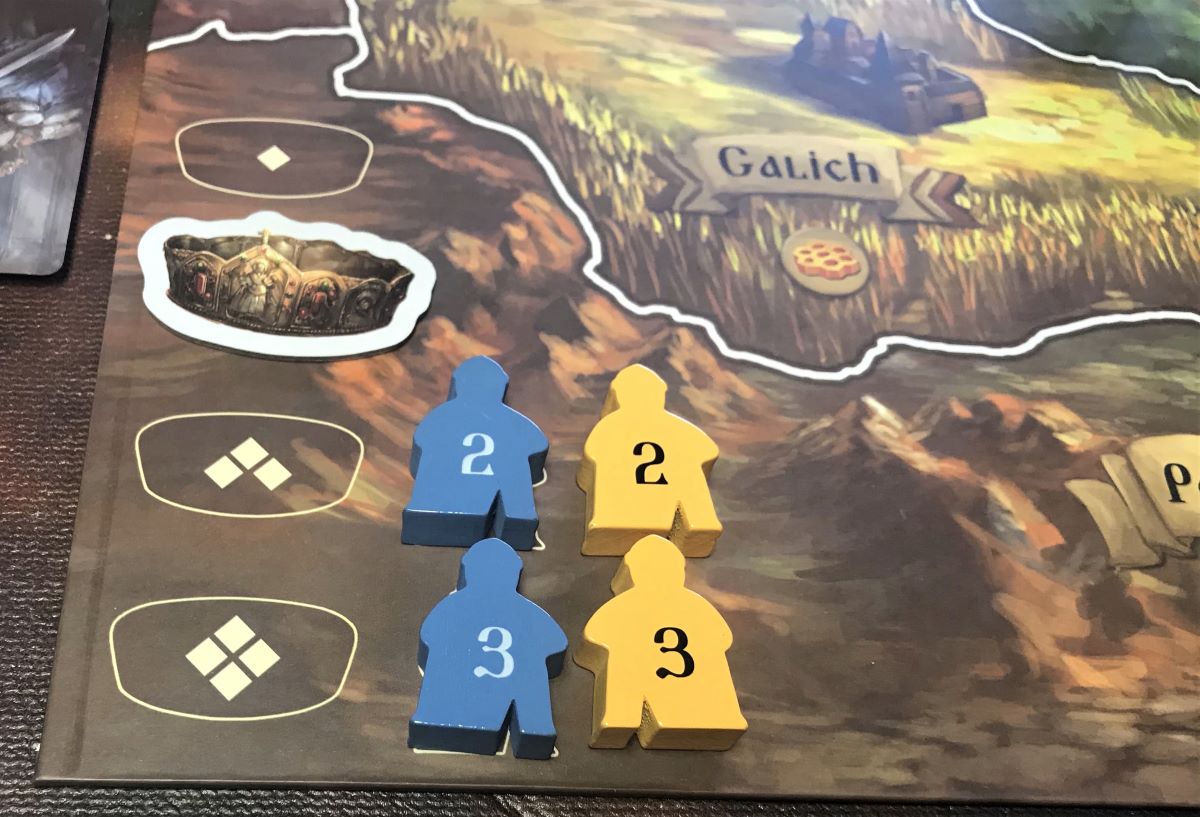
After determining the first player (the instructions suggest whoever is most knowledgeable about Eastern European history), each player beginning with the first places one of their troop miniatures in the region of their choice, until each player has placed three troops. Finally, each player places their leader in one of the regions where they have placed at least one of their troops, and you’re ready to play.
Gameplay
Rurik: Dawn of Kiev takes place over 4 rounds. Each round is broken down into 3 phases: Strategy, Action, and Claim.
Strategy Phase

This phase is the most innovative feature of Rurik. PieceKeeper Games calls it “Auction Programming,” and it’s action selection with a twist. Players have advisors numbered 1-5 (though not all of them will be available during all the rounds, as noted in setup). During the strategy phase, each player starting with the first will place one of their advisors onto one of the tracks of the strategy board, in any order that they choose. Each track matches the different actions that can be taken during the Action Phase. The higher positions on the track allow you to take more actions. The lower positions still let you take actions, but you may have to pay coins in order to do so depending on how low on the track you are. Advisors, no matter what their number, will always go at the top of an empty track.
If someone places an advisor of a higher number than any that are already on that track, those lower numbered advisors will get bumped down, making room for the higher number. If a track is full, no advisors may be placed.
Finally, you have the option of adding bribes. When you place an advisor, players may add as many coins along with that advisor as they’d like. Bribes add the coins to the numerical value of the advisor. For example, a #2 advisor with 4 coins would effectively become a #6 advisor for determining where it would place on a track of the strategy board.
But why would you want to waste 4 coins on a #2 advisor, instead of just using one coin on a #5? Let’s look at the next phase, and you’ll see why the Strategy Phase is actually the most nailbiting part of the game (in a good way).

Action Phase
Starting with the first player and proceeding clockwise, players will resolve their advisors. But in this phase, you begin with the #1 advisors, then resolve the #2’s, and so on until each player has resolved all of their advisors. As you can see, there’s a balance you must strike in the Strategy Phase between having high enough numbers to get the actions you want, while also being able to take your actions in the order that you want. For example, it does you no good to have an attack action be your first action, if you have nothing to attack. It is important to note that the bribe that was used during the Strategy Phase only matters for placing the advisor; that #2 advisor from the previous example counts as a #2 for resolving in the Action Phase, no matter how many coins were placed with it.
When it is your turn to resolve an advisor, you take whatever action that advisor is placed on. In the example below, if the yellow player was the first player, they would start the phase by taking the action underneath their #1 advisor, in this case the “Muster 2” action:

If you are unable to take the action when it’s your turn, or don’t want to, you can instead receive one coin from the supply.
The 6 different actions that can be taken are: Muster, Move, Attack, Tax, Build, and Scheme.
Muster
Take one troop from your supply for each helmet symbol your advisor is on. Place them in regions where you already have troops.
Move
For each boot symbol, you get a movement point that can be spent moving a troop from one region to an adjacent one. You may move into and through regions occupied by enemy troops.
Attack
You get a number of attack points equal to the number of swords on your advisor’s space. You can spend attack points attacking either rebels or other player’s troops in the same region as your troops and/or leader.
When you attack a rebel, you remove it from the board and place it near your household mat. You also immediately gain whatever reward is at the bottom of the rebel miniature.
When you attack an opponent, that player removes one of their troops, or their leader if that is the last troop to be removed. You then advance your warfare marker on the Claim Board. Finally, you must check to see if you received a casualty by drawing and revealing scheme cards. If a casualty icon is revealed, you must remove one of your troops from that region as well.
Tax

Your tax points are equal to the cart symbols under your advisor. You can spend one tax point to collect a good from a region you rule, or two from a region you do not rule. You rule a region when you have more troops in that region than any other players. Goods are placed either onto the boat on your household mat, or onto the dock.
Build
Each hammer icon represents a build point. It costs one build point to build a structure in a region you rule, or two build points for a region you don’t rule. There are three different structures you can build, but there can only ever be one of each type per region.
The three buildings are:
- Church. When built, remove a rebel or opponent’s troop and replace it with one of your own from your supply.
- Market. If you tax a region that has your market in it, you gain either an extra good of the same type, or a coin.
- Stronghold. Counts as one of your troops for determining rule, and an opponent has a greater chance of taking a casualty when attacking you in that region.
Scheme
Draw a number of scheme cards as indicated by the card icons from one of the two scheme decks, choose one card to keep, and then return the remaining cards in any order to the top of the deck you drew them from. If your advisor is in the top spot of the scheme track, you also take the first player marker.

Scheme cards give you useful bonuses, such as attack points, build point, and coins. Deed cards have prerequisites that must be met. Once they are met, upon accomplishing them you gain an immediate reward as well as victory points that will count towards your total. For example, one of the deed cards requires you to have built churches in three adjacent regions. Accomplishing this gives you three coins as a reward, and will earn you one victory point in the final tally.
In addition to the actions from the Strategy Board, there are three different bonus actions you can take each turn: playing a scheme card, accomplishing deeds, and converting goods using the conversion tokens on your household mat.
Claim Phase
This phase is broken up into 6 steps:
- Advance on Claim Tracks. Move your marker up each track of the Claim Board if you have met the requirements. Note: you can never move back down on the track, only up.

Advancing on Claim Tracks. Image by Paul Benson. - Earn Income. Earn a coin for each of your claim and warfare marker not yet placed onto a track on the Claim Board, and a coin for each completed column of goods on your boat.

Coins are earned for each column on your boat filled with good. Image by Paul Benson. - Choose Deed Cards. Starting with the first player, choose one of the three Deed Cards from the face up row. After a card is chosen, another is drawn from the deck to take its place.
- Refresh Conversion Tokens. A conversion token is flipped after it is used during the Action Phase; now flip it right side up.
- Replenish Goods. Replace any of the goods on the game board that were removed when regions were taxed.
- Advance the round marker. If the marker reaches a space with advisors next to it, then the players each receive their new advisor for that round.
End of Game
At the end of the 4th round, during the Claim Phase you will only do the first step, advancing on the claim tracks. Then you will score your total victory points based on:
- Positions on each of the Claim Tracks
- If you are in First or Second Place on the Warfare Track
- Earn two victory points if you accomplished your secret Agenda
- Earn victory points listed on any accomplished Deed Cards
Variants
There are three variant modes included in the main rulebook, which provide small changes in how you play the game. Additionally, if you have the Kickstarter version of Rurik or have separately purchased them, the Intrigue Cards provide yet another way to spice up your games. None of these variants fundamentally changes how you play; they are more akin to optional house rules.

Solo Mode
Included with the game is an elaborate Solo Mode, where you will choose a leader as usual but play against Sviatopolk, leader of the Rebellion. There are four levels of difficulty that you can choose from for this mode. The A.I. of the Rebellion is controlled by a solo deck, and the detailed rules (almost as long for the solo mode as for the main game itself) provide the player with a challenging opponent.
I’m not generally a fan of solo modes in games, but this one is extremely well thought out. It is also rare to find a single player variant with this kind of gameplay. If I had any quibbles about the mode, it’s that you have to frequently refer to the rulebook, as there are very specific rules and priority orders for how The Rebellion takes each of its actions. But that specificity is what makes the solo mode work so well playwise; it’s the tradeoff you must take for superior solo gameplay.
The Verdict: Rurik: Dawn of Kiev
At a casual glance, Rurik would appear to be a “dudes on a map”-style area control game. However, ruling regions is just one of the pathways to follow in achieving victory, and in this game you can never rely on pursuing just one path if you want to win the game. This is a game about ruling, and as such you must have a multi-pronged approach. You will build, you will expand, you will tax the regions you control. And, yes, you may fight. But as you can see, the Warfare track only rewards first and second place, and those rewards are relatively slim compared to what you can reap from the three main tracks on the Claim Board: Rule, Build, and Trade.
Each of the leaders provides players with a small, unique benefit. None of these powers is game-breaking, and often you’ll find that you only use a leader’s power once or twice per game. If you get lucky when you draw your Agenda Card, you might get something that works well with your leader’s power. In one game, I was lucky enough to have both a leader who could build for cheap in regions that he doesn’t rule, along with an Agenda Card that gave me two victory points for finishing first on the build track. But this combo was far from game-breaking; I just had a slight edge for completing that particular Agenda Card. And remember, that card is only worth two points (though I did also get eight victory points for finishing at the top of the Build Track.)
This is a game that is very easy to learn. The rules are clearly laid out, with plentiful illustrated examples. I also found that I could easily play by just following the information on the included player aid cards. On my very first game I was taught how to play by a friend, and he told us that we could only take one of the three bonus actions in a round. That just felt wrong to me, and after the game I looked up the rule. Sure enough, it felt wrong because it was. The rules for Rurik are tight and logical, leading to a satisfying gaming experience.
As mentioned earlier, the real star of the show when it comes to Rurik: Dawn of Kiev is the auction programming that takes place during the Strategy Phase. This system is elegant in its execution, and provides exquisite tension amongst the players as they each place their advisors, hoping to keep their positions on each of the tracks on the Strategy Board. It’s also a bit of a brain burner of a risk/reward puzzle, as each player has to not only jockey for position to get the actions that they want for the round, but place their advisors in the best numerical order so that they have maximum effectiveness during the Action Phase. This tension is at its maximum in a 4-player game, where it’s very easy to fill up the tracks, blocking out one or more players… so when you place an advisor also becomes an important factor during the Strategy Phase. The game is very playable at all player counts, but four players in my opinion provides the maximum enjoyment.
Rurik: Dawn of Kiev blends a strong theme, great components and a fantastic ruleset into a truly satisfying competitive game. While you can thwart other players’ plans (both intentionally and inadvertently), there is no “take that” aspect of the game. The balance in Rurik was obviously deeply tested, as the game works well at all player counts, and the benefits from leader powers and scheme cards are never game-breaking. If you are looking for a realm building game with a unique mechanic that satisfyingly plays in 1-2 hours, then definitely check out Rurik: Dawn of Kiev.
![]() To subscribe to GeekDad’s tabletop gaming coverage, please copy this link and add it to your RSS reader.
To subscribe to GeekDad’s tabletop gaming coverage, please copy this link and add it to your RSS reader.
Click here to see all our tabletop game reviews.
Disclosure: GeekDad received a copy of this game for review purposes.